Report Template
The Report Template Configuration feature in your Material Testing Application's admin panel empowers users to customize report layouts with ease. This documentation aims to ensure that users can efficiently configure report templates to meet their specific needs, enhancing the quality and clarity of material testing reports. If users encounter any challenges or have additional questions, they can refer to this documentation for guidance and support.

Accessing Report Template Configuration
To access the Report Template Configuration feature, follow these steps:
- Log in as an admin.
- In the left side menu of the admin panel, you will find the Report Template Configuration option.
This feature has two main parts: Page Template and Template Configuration.
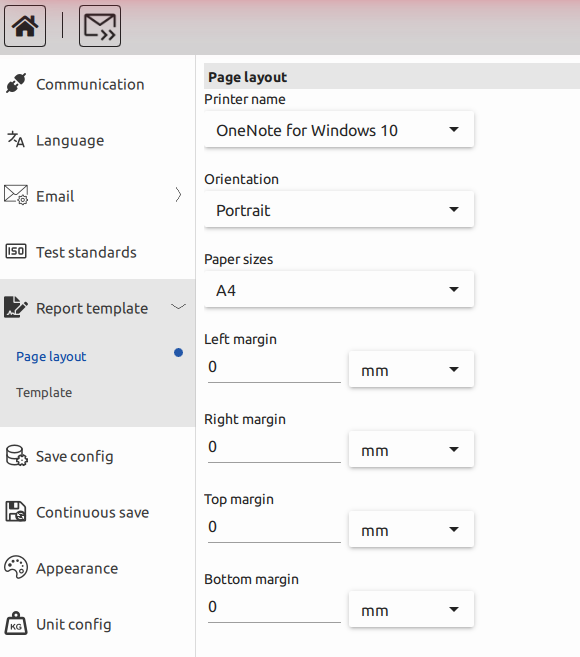
1. Page Template
1.1. Printer Settings
Describe how users can select the printer for report output. It will use the ready printers of your PC or Device.
1.2. Page Orientation
Explain how to set the page orientation (portrait or landscape) for the report.
1.3. Paper Size
Detail the available paper size options, including A4, letter, legal, and other international standard sizes.
1.4. Margin Settings
Guide users through configuring the left, top, right, and bottom margins for the report page.
2. Template Configuration
Within the 'Template' section, users can access a preview of the complete page template, allowing them to visualize the template's appearance before generating the report.
2.1. Header and Footer Section
The Header(Footer) section can be divided into three parts: the left, middle, and right sections. In each of these sections, users can add elements based on their specific needs. We offer a variety of options to include in the reports:
- Logo
- If you want to include your company logo or any other images, you can add them in this section. You have the flexibility to adjust the logo's alignment and height according to your preferences. Our application supports a wide range of image file formats for setting the logo.
- Date
- You can also include the date of the report or the date of the last report in the header or footer. Additionally, you have the flexibility to adjust the alignment and format of the date.
- Custom Text
- If you need to incorporate custom text, such as an operator's signature or any additional notes, you can conveniently do so within this section.
- Page Number
- To enhance report organization, you can add page numbers to your reports, providing a clear reference point for easy navigation.
2.2. Chart Section
Explain how the Chart(s) will be printed in the report, including the option to hide or reposition it.
2.3. Parameter Table
Explain how the Parameter Table will be printed in the report, including the option to hide or reposition it.
2.4. Result Table
Explain how the Result(s) will be printed in the report, including the option to hide or reposition it.